[Graphic design tutorial] This post will show you how to make a gradient mesh in Inkscape - Gradient meshes are used to enhance the realism of objects with reflective surfaces, or to create abstract wallpapers to support your artwork.
By the default, Inkscape doesn't have ( precisely has been hidden - no icon for it in the toolbar and no option in the menus ) a gradient mesh tool like Adobe Illustrator and some other applications. But, there are simple tricks we can to do to unlock the gradient mesh tool in Inkscape. Ok, let's start!
By the default, Inkscape doesn't have ( precisely has been hidden - no icon for it in the toolbar and no option in the menus ) a gradient mesh tool like Adobe Illustrator and some other applications. But, there are simple tricks we can to do to unlock the gradient mesh tool in Inkscape. Ok, let's start!
1. Unlocking Gradient Mesh Tool
First, I’ll show you how to unlock this hidden feature in Inkscape. Follow the steps below :
Step 1 - Open new terminal window or press Ctrl+Alt+T.
Step 2 - Run the following command.
sudo scratch-text-editor /usr/share/inkscape/keys/default.xml
Note: Change the scratch-text-editor with your favorite text editor (gedit, mousepad, etc). Read our post //MODERN TEXT EDITOR.
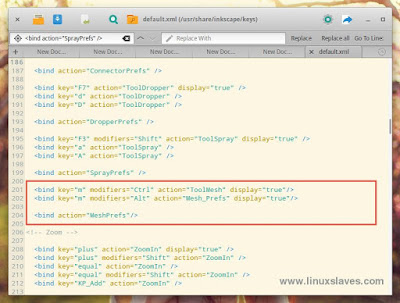
Step 3 - Once opened, now search <bind action="SprayPrefs" />, then add the following code :
<bind key="m" modifiers="Ctrl" action="ToolMesh" display="true"/>
<bind key="m" modifiers="Alt" action="Mesh_Prefs" display="true"/>

<bind action="MeshPrefs"/>
See the screenshot below for more details :
That's it, now the Gradient Mesh tool is ready to use!
UPDATE!
The new version, mesh gradients are now supported in Inkscape 0.92. The are also many new features and improvements you can try. So all you need is install or upgrade your Inkscape to latest version.
2. Make a Gradient Mesh in Inkscape
Here we go for the main post, a step-by-step tutorial making the gradient mesh in Inkscape Vector Graphics Editor.
Step 1 - Open your Inkscape.
Step 2 - Create a rectangle or square object. For additional, you can convert it to a path. Open Path -> Object to Path or simply press Ctrl+Shift+C.
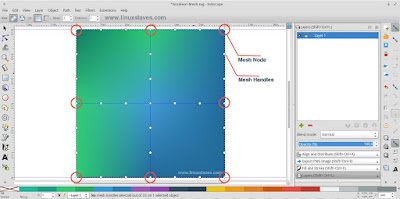
Step 3 - Now select the object, then press Ctrl+M to show gradient mesh tool in Inkscape as shown above :
You can change the number to add / remove the nodes.
Step 4 - Click on the Mesh Node ( diamond-shaped nodes ) and fill it with flat, material or any color you want. In this case, I'm using flat colors.
If you need the flat design colors, and material pallete for Inkscape and Gimp, you can grab it from Importing Flat, Material Design Color Palette into Gimp and Inkscape.
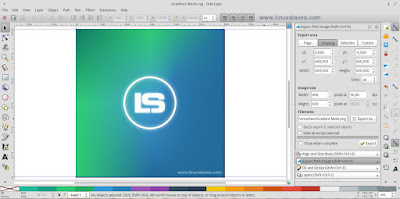
The final ( additional ), you can put your own logo there. Cheers!
Quick Gradient Mesh Tips
There are two important basic points that you need to know when you work with meshes in Inkscape - see at step 4's screenshot. They are :
1. Mesh Node
The mesh is diamond-shaped nodes. You can click on these and then select a color and the color will be applied in the node’s area of influence. You can also drag nodes around, deforming the mesh.
You might also like :
- Gpick and Pick, Simple Color Picker Tools for Your Linux Desktop
- Create Flat Design Icons With Long Shadow Effect on Inkscape
2. Mesh Handles
The circles-shaped nodes are handles. When you move handles, it will modify the gradient curve between nodes.
Watch, Make a Gradient Meshes Tutorial in Inkscape
So that is all I can write about a inkscape tutorial, unlocking gradient mesh tool and how to make gradient mesh with a video embedded. Thanks for visiting Linuxslaves!


